How to transfer/copy files between local and server using a remote desktop connection?
Publisher: Psychz Networks, October 05,2020If you have recently purchased a Windows 2019 Server (Dedicated/VPS), you may want to transfer some of your files from your local machine. This is possible through FTP connection; however, no FTP server is installed on most of the Windows Dedicated Servers by default. Therefore, the simplest way to transfer/copy files between the server and your local machine is to copy via the Remote Desktop.
If you wish to buy a Windows 2019 server, you may simply visit https://www.psychz.net/dedicated-hosting.html. Psychz Networks offers Express deployment of your servers using a real-time inventory system where you can add a machine to your cart, checkout in a jiffy, and your server will be ready in few minutes.
Using Windows Remote Desktop built in feature, you can transfer files between your local machine on the server network. You can select the folder that holds the files, and the server can find and connect to that folder. Remote Desktop Connection feature in Windows allows you to control the remote server where you can share your local drive and transfer files between the two machines. File transfer using this feature is secured because the drive or folders are not being shared permanently but is only allowed as long as the Remote Desktop Session is active. Using Remote Desktop Connection, you can redirect the local disk drives, including the hard disk drives, CD-ROM disk drives, floppy disk drives, and mapped network disk drives. You can transfer files between the local host and the remote computer in the same way that you copy files from a network share. This method of transferring files is far easy compared to FTP and saves lots of time.
- Step 1: Connect to your server
- Step 2: Remote Desktop Connection sung your local machine
- Step 3: Open Local Resources option
- Step 4: Selecting drives and folders
- Step 5: Explore connected drive
In the following steps, we will see how to connect to your server using Remote Desktop Connection and share your local drives' files.
Note: The 'RDP' function is not enabled by default yet for new Windows Server 2019 installations (due to security reasons) but can be enabled via the Server Manager. To enable the same, please follow Step 1. If the RDP function is already enabled on your server, please skip to Step 2.
Step 1: Connect to your server using VNC or IPMI.
Click on the Start menu, followed by the Server Manager. Once the window is open, click on Local Server on the left. One of the visible options is Remote Desktop, whose status is 'Disabled' by default. Click it to enable Remote Desktop.This should enable the Remote desktop feature.

Step 2: Connect to your server using Remote Desktop Connection.
Start Remote Desktop Connection (Start >> Programs >> Accessories >> Remote Desktop Connection). You can also open this application by running the application mstsc.exe from the run prompt.
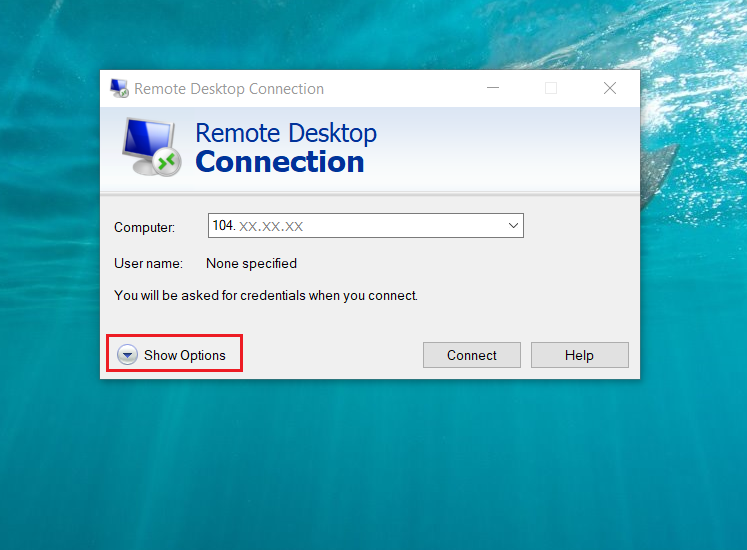
Enter your server IP address along with the port. Now, before you click on the Connect button, click on the Show Options button on the bottom left of the window.

Step 3: Open Local Resources option
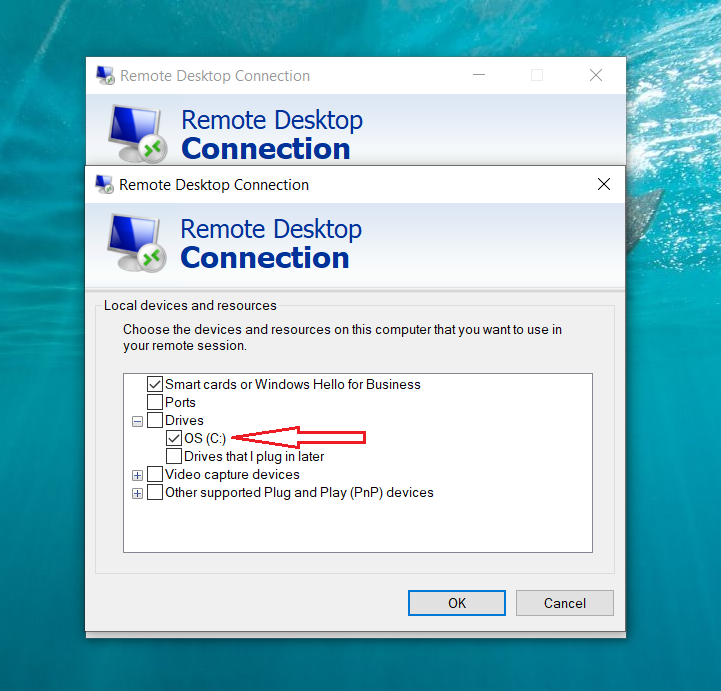
Click on the Options drop-down and then select the Local Resource tab. At the Local Resources tab, click on the More button.

Step 4: Select the drive/folders.
You can now select the local drives you would like to share with your Remote server. Click on the checkbox to select the drive and click OK to continue. Now, click on Connect to establish a connection with your server.

Step 5: Explore My Computer to view your connected drive
Once you are connected to your server, you can see the selected drives under Devices and Drives under This PC on your server. You can drag-and-drop files from the attached drives to your remote server.

There is another way you can transfer files once you are connected to your server using Remote Desktop Connection by drag and drop or copy and paste files from your local machine to your remote machine. However, this method is not recommended as there is a massive amount of overhead with this option, and you should try not to use it for transferring more than a few files or a few dozen Megabytes at a time.


