How to temporarily/permanently enable DDoS IP diversion for a Single IP Address?
Publisher: Psychz Networks, August 12,2019Psychz Networks offers great security from the DDoS attack. With our true DDoS Protection, we are able to mitigate layer 3/4 attacks as well as effectively protect you against the hard to detect layer 7 attacks that target application layer using only a small amount of bandwidth. However, there can be instances where the DDoS system will not detect the attack and not divert the traffic thus allowing the attack to go directly to the server without any filtering. In such a situation, IP diversion comes in really handy.
- Step 1: Login
- Step 2: Add IPs
- Step 3: Selecting Device
- Step 4: Selecting IP Range
- Step 5: Adding range
- Step 6: Selecting Diversion Type
- Deleting IP Diversion
In the following article, we will learn how to add IPs to create Temporary or Permanent Diversion using your client Dashboard.
Step 1: Login to your Dashboard and go to "Tools"
You must be logged in to your dashboard before we start adding IPs to diversions. You can do so by clicking on the following link https://www.psychz.net/dashboard/client/web/site/login
Once you login to your dashboard, on your left you will see option "Tools". Click on it to expand and you will see the third option "DDoS IP Diversion" as shown in the screenshot below. Kindly click on the "DDoS IP Diversion" button to go further.

Step 2: Add the IP/IPs
Once you click on the "DDoS IP Diversion" button, you will be directed to the page where you can add a new IP to create a rule for Diversion. You can also view any existing rule on this page and choose to delete it if not required.
Click on the "Add" button to start adding the IP.

Step 3: Select the Device
Once you click on the "Add" option, you will be directed to a page where you can add the device which is currently under attack, add the IP/ IPs that are being DDoS-ed. The first option you will come across is "Devices". The dropdown will show you all the devices you currently have and are running. You need to choose the one which is being attacked so you can add the desired IP to Temporary or Permanent diversion.

Step 4: Select the IP range
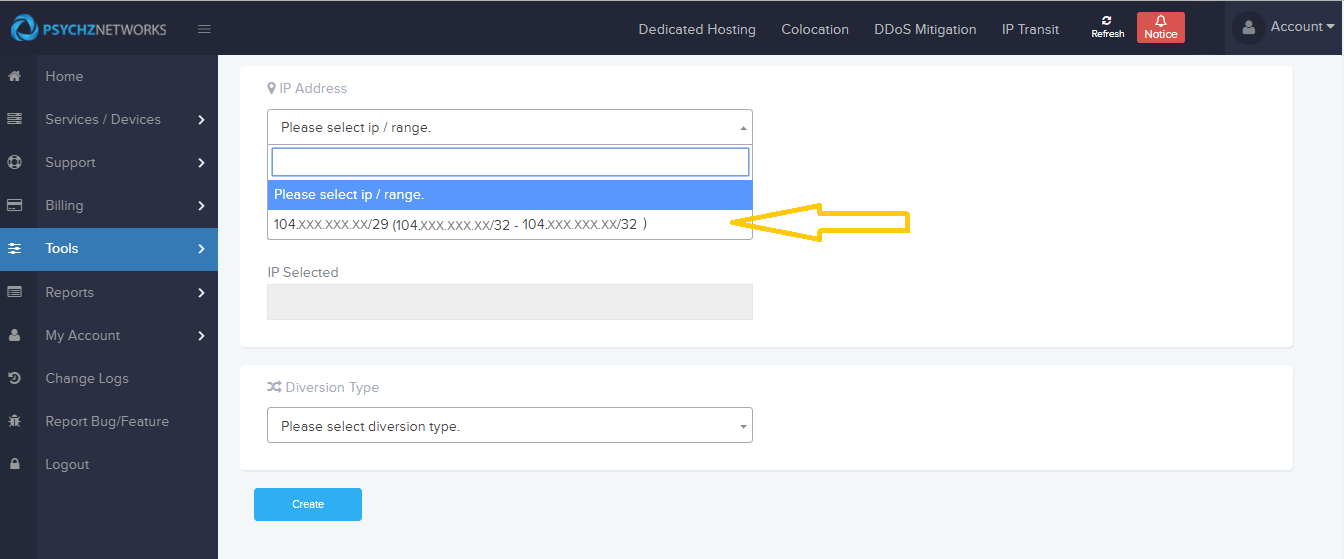
Once you have added the device, you will have to choose the IP range which is experiencing the DDoS attack. Click on the "Please Select IP / Range" option to view all the IP ranges currently assigned to your Device/Server. Click on the IP range to select it as shown in the screenshot below

Step 5: Add the desired IP
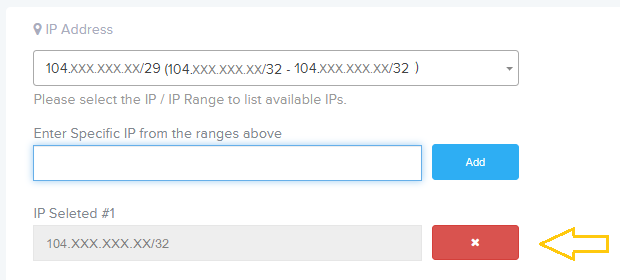
Once you select the IP range, you need to add the specific IP/IPs that is/are being attacked. Please use the input box to enter the IP as shown below and click on "Add" to add the IP.
Note: You need to enter the IP address within the range that has been marked in the reference as shown in the screenshot below

Once you click on Add button, you will see that the IP has been added successfully. You can delete it if you added it by mistake by clicking on the "X" button as shown.

Step 6: Select Diversion Type (Temporary / Permanent)
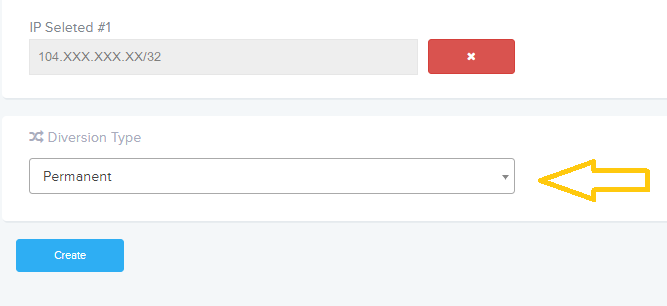
Once you have successfully added the IP, you can choose the diversion type by clicking on the dropdown menu as shown below.

Step 6.1: Temporary Diversion
Temporary diversions are only useful when you are under attack and you would like to mitigate an attack that is taking place at that point in time by placing the IP inline. Temporary diversions are removed automatically from the DDoS appliance after the time period that you choose while creating the diversion.
Note: The minimum time frame that you choose is 24 hours. The maximum you can go up to is 72 hours.

Step 6.2: Permanent Diversion
A permanent diversion will place the IP on the DDoS system 24/7 and will mitigate all traffic that is coming into the network. This may also block all the clean traffic coming in on that particular IP address. You can choose to delete the permanent diversion if it's causing any issues with traffic.

Note: Once you create an IP Diversion rule, it takes approximately 1-5 mins to process and come in effect.
Deleting an IP Diversion
To delete a diversion method in case you want to modify the rule or if the existing rule is creating a problem for traffic coming in and going out of your server, simply follow the "Step 1" given above which will take you to the page where you can see all the rules created and are currently in effect. Click on the button under "Action" as shown in the screenshot below to delete the diversion rule.

The IP Diversion technique is specially used in a specific type of DDoS attacks and hence you need to be sure before you add the diversion on your IPs. In case you are not sure, you can contact our support team by opening a ticket from your dashboard and they will help you with further assistance.


